Posts

Showing posts from September, 2020

How to Retrieve Lost Files From a Formatted SD Card

Image
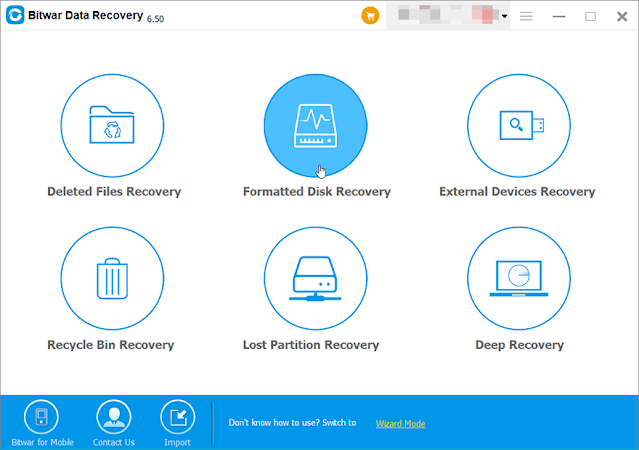
Files deleted by formatting the disk are supposed to disappear forever. However, there are traces, generally left by disks, from which some useful programs can retrieve them. With a plethora of such tools flooding the internet, Bitwar Data Recovery stands out as one of the easiest and powerful tools. Needless to say, recovering lost files from a formatted sd card is not a problem for this program. Take a look at the following guide to learn how quickly files can be recovered by using Bitwar Data Recovery. Step 1: Download the program according to your computer system on the page:  Bitwar Data Recovery Software | Free Download to Recover Data . Step 2: Launch and install the program. Step 3: In the main interface, Click Standard Mode right below the center and select Formatted Disk Recovery. Step 4: In the following stage, select your sd card and click on Next. Step 5: Check off Select all types and click on Scan. Step 6: Select the files you want and click on Recover.

How to Recover Lost Files From an Empty Recycle Bin

Image
For some computer users, knowing that bunches of files are gathering in Recycle Bin makes them uncomfortable, hence making them develop a habit of emptying Recycle Bin regularly. It’s a good habit as long as deleted files are no longer needed. But if users unintentionally delete important files, what can they do to recover those files? A good rule of thumb for addressing such minor problems is to find a handy program unless those files are so important that you can’t risk losing them. Were this the case, it would be better to turn off your computer and take the disks to see an expert for help. But that would probably cost you a lot of money. So it is more sensible and economical to use a reliable and user-friendly program, Bitwar Data Recovery, for instance. Using this software to recover lost files generally takes only a few steps, as shown below. Step 1: Download the program according to your computer system on the page: Bitwar Data Recovery Software | Free Download to Recover Dat

How to Change the Default Recycle Bin Icon in Windows 10

Image
Many computer users find the current default recycle bin set by Windows 10 is not obviously transparent. Luckily, if you want to replace it with other cool and pretty icons, you don’t need to download some third-party utility to change the default icons in Windows 10. Windows 10 offers an easy way for users to do that. Replace the default recycle bin with a new one Step 1: Right-click on the desktop and choose Personalize. Step 2: Navigate to Themes. Step 3: Scroll down to the Related Settings section and click on Desk icon settings. Step 4: Select a recycle bin icon (full or empty) in the box and click on the Change icon. Step 5: Then there are two ways offered for users to change the default icons of certain applications. one is to browse the disks to select the one you have saved. The other one is to use the icons saved by Windows 10. Note: The icon file must be in .ico format. Users can download any image they like and convert them to an file in .ico format through an online imag

[Fixed]You Don’t Currently Have Permission to Access This Folder in Windows 10

Image
Computer users often encounter a prompt showing an error that reads:  You Don’t Currently Have Permission To Access This Folder.  Generally, this problem occurs while users are trying to access a folder in Windows 10. It also prevents users from deleting and renaming the folder. It sounds fairly bad, but in most cases, just a few steps will be enough for users to fix the problem. The method is to give permission to the folder, as shown below. Step 1: Right-click on the folder which you’re unable to access and select Properties. Step 2: Switch to the ‘Security’ tab. Step 3: Under ‘Group or user names’ click on ‘Edit’ Step 4: Click on ‘Add’ Step 5: In the ‘Enter the object names to select’ box, type ‘everyone’ Step 6: Click on the ‘Check names’ button and then click on ‘Ok’ Step 7: In the ‘Group or user names’ box, select ‘everyone’ and select ‘Full control’ under ‘Allow’ and then click on ‘Apply’ and click ‘Ok’

[Fixed]Can't Turn off Airplane Mode in Windows 10

Image
Airplane Mode is a handy feature that made its debut in Windows 10. It disables Wi-Fi, FM radio, Bluetooth and network connections. Although few problems occur when users turn it on, many users do find they sometimes can’t turn off airplane mode. If you are one of them who want to turn off airplane mode in windows 10, check out the following three solutions to learn how to turn it off. Solution 1: Turn off the Airplane Mode via Settings Step 1: Press Win + I to launch settings and then click on Network & Internet . Step 2: Click on Airplane Mode. On the right page, switch the toggle below Airplane Mode to turn it off. And turn on Wi-Fi and Bluetooth toggle. Solution 2: Turn on Wi-Fi If the solution one doesn’t work for you and you still want to use a Wi-Fi connection, you can do what the following steps show. Step 1: Press Win + I to launch settings and then click on Network & Internet . Step 2: Click on Wi-Fi and switch the toggle below WLan on the right page to

How to Install a Theme From the Store in Windows 10

Image
The feature Theme made its debut in Windows 7 and has been inherited by Windows 10. It usually includes  a pack of wallpapers and a colour for the window border. Many other themes provide other pleasing alterations to desktop icons or screensavers. If you are concerned about how to install a theme, refer to the following guide to learn that via Store. Step 1: Press Win + I open Settings. Step 2: Navigate to  Personalization  >  Themes . Step 3: On the right page, scroll to click on the  Get more themes in the Microsoft Store   link. Step 4: Select a theme you want and then click on Get  to install it. Step 5: Open Settings again, and then navigate to  Settings  >  Personalization  >  Themes . Step 6: On the right page, double-click on the theme to apply it.

How to Rename a Local Account in Windows 10

Image
This article lays out how to rename a local account in Windows 10.  Step 1: Press Win + Q and type in Control Panel. Step 2: Navigate to User Accounts > User Accounts > Manage another account. Step 3: Click on the account, and then click on Change the account name. Step 4: Type in a new name and then click on Change Name.

How to Remove Programs From Startup via settings in Windows 10

Image
The time a computer uses to boot itself increases as users either inadvertently or deliberately make more programs load with the operating system. So removing programs from Startup can usually speed up the process of booting. Referring to the following steps to learn how to remove unnecessary programs from Startup via Settings in Windows 10. Step 1: Right-click on the Start menu and then select Settings. Step 2: Navigate to Apps > Startup. Step 3: On the right page, scroll down and turn off the toggle next to the program that doesn't need to be booted along with the operating system.

How to Open on-Screen Keyboard via Settings

Image
Not every user has used the on-screen keyboard, Many may even be surprised that it has been in use since Vista. Windows 10 has inherited the treasure and kept maintain it for users who often use them. If you are interested in how to open the on-screen keyboard via settings in Windows 10, use the following steps. Step 1: Press Win + Q to, type in Settings and open it. Step 2: Navigate to Ease of Access > Keyboard. Step 3: On the right page, scroll down to find the Use your device without a physical keyboard section. Step 4: Turn on the toggle under it. Step 5: Look at the note below it you will learn that Win + Ctrl + O is the shortcut for the on-screen keyboard.

How to Uninstall a Program via Settings in Windows 10

Image
In many different scenarios computer users need to uninstall a program. One of the simplest reasons could be to speed up the operating system. and free up drive space. For users who are used to the traditional way used to uninstall applications via Control Panel, windows 10 has offered a different way. Refer to the following steps to learn how to uninstall applications via settings. Step 1: Press Win + I to open Settings and then click on Apps. Step 2: On the right page, scroll down to look for the program you want to delete. Step 3: Click the program and then click on Uninstall. Step 4: Click on Uninstall to confirm the operation.

[Fixed]Disk Cleanup Icon Is Missing From Drive Properties in Window 10

Image
As a built-in tool in Windows 10, Disk Cleanup is helpful when you want to delete junk files such as temporary internet files, error reporting files, thumbnail files and old windows installation files. There are to ways to open the tool, one is by typing in the name of the tool in the search bar, the other is to right-click on a drive in File Explorer, select Properties and then click on the Disk Cleanup button under general tab. Many users are reporting that they don't see the cleanup button in the Properties window of a drive. If you encounter the same issue and want to add the button to the Properties, use the guide: Step 1: Right-click on the Recycle Bin icon on the desktop. Step 2: Select Properties. Step 3: Under the General tab, select the drive the cleanup icon of which is missing. Step 4: Check off the Custom size option. Step 5: Click on OK.

How to Create a Website Shortcut Using Chrome/Firefox in Windows 10

Image
Websites saved on a certain file can be used as shortcuts that users can launch them without the need to launch some web browser and refer to bookmarks. Besides that, shortcuts of websites can be sorted and stored in certain folders, another great advantage. So, if you are interested in how to create website shortcuts on the desktop or a folder using Chrome or Firefox, use the following guide: Step 1: Launch the Chrome browser. Step 2: Open up the URL the shortcut of which you want to create. Step 3: After the website has been loaded, click on the lock icon beside the address bar and then drag and drop it on the desktop.

How to Shrink a Volume or Partition Using Disk Management in Windows 10

Image
Most users create multiple partitions on the drive where the system is stored to avoid having to save the files to be stored later to the same drive. That's a prudent action unless the partition allocated for the system is too big to be a waste. In this case, users can use Disk Management to shrink the drive where the system is stored to create new partitions. Use the following steps: Step 1: Press Win + Q and type in Disk Management.  Step 2: Right-click on the partition you want to shrink and then select Shrink Volume. Step 3: Type in the desired sizes you want in the fields in the Shrink window. Step 4: Click on the Shrink button to proceed.

How to Add an Additional Column to Start Menu in Windows 10

Image
Usually, there are three columns on the start menu in windows 10. Although it satisfies most users' needs. If you want to enlarge the menu, you can add a fourth column to it. Use the following steps to learn how to add an additional column to Start Menu. Step 1: Right-click on the Start icon and then click on Settings. Step 2: Navigate to Personalization > Start. Step 3: On the right page, turn on the toggle under the Show more tiles on the Start option.

How to Create keyboard shortcuts for Apps in Windows 10

Image
Users of Windows 10 often have their apps pinned to the start menu. That's a convenient way for them. Apps are sorted out in a plain way and usually by two clicks users can launch the app they want. But for users who have a relish for a quicker way to open frequently-used apps, keyboard shortcuts should be a more desirable choice. Refer to the following steps to learn how to create keyboard shortcuts for apps. Step 1: Press Win + Q and type in the specific app. Step 2: Right-click on the app and click click on Pin to Start. Step 3: Open the start menu, look for the app and then drag it to the desktop. Step 4: Right-click on the app on the desktop and then select Properties. Step 5: Under the Shortcut tab, press a compound key in the field next to Shortcut Key . Step 6: Click OK to finish the setting.

How to Clear the Thumbnail Cache in Windows 10

Image
The Thumbnail cache is where the record of operations relevant to files. It stores a copy of all the pictures, videos, and documents, hence next time you can do the operations that you have done before at a higher speed. So, if the cache is crammed full of those file traces, you might not see previews displayed on image files. Refer to the following steps to learn how to fix it. Step 1: Press Win + Q and type in disk cleanup. Step 2: Select the drive where the system is stored. Step 3: Within the files to delete section, scroll down to look for Thumbnails. Step 4: Check off the box next to it and then click on OK. Step 5: Click on Delete Files.

[Fixed]Thumbnail Previews Not Showing in Windows 10 File Explorer

Image
The File Explorer in Windows 10 offers users eight ways of viewing:  extra large icons, large icons, small icons, tiles, list, content, medium icons, and details. Some of these views present thumbnail previews of pictures and videos to help users find the files they are looking for. Sometimes this feature could run into issues, failing to present previews. Refer to the following steps to learn how to fix it. Step 1: Press Win + E to open File Explorer. Step 2: Click on the View tab and make sure that you have turned on any of the following five views. Extra large icons Large icons Medium icons Tiles Content Step 3: Click on the File tab at the upper-left corner. Step 4: Select  Change folder and search options . Under the View tab, uncheck the option labeled  Always show icons, never thumbnails . Step 5: Click on OK to finish the setting.

How to Reinstall Sticky Notes App via Settings in Windows 10

Image
 Stick notes, with which users of Windows 10 can almost stick notes to almost anything like the physical version of 3M post-in stick notes, made its debut in Windows 7. If the application has run into issues, a quick way to tackle the problem is to reinstall it. Use the following steps to learn how to reinstall it via settings. Step 1: Press Win + Q, type in Settings, and open it. Step 2: Click on Apps. Step 3: On the right page, scroll down to look for Sticky Notes. Step 4: Click on it, and then click on Uninstall. Step 5: Open the Store app, type in Windows Sticky Notes in the search bar and then install it.

How to Create Shutdown, Hibernate & Sleep Shortcuts on Desktop in Windows 10

Image
Windows 10 has made a lot of advancements when it comes to offering many ways for users to perform Shutdown, Hibernate, Sleep, and other features. Among those ways, there is an intriguing one in which users, for example, double-click on the Shutdown shortcut created on the desktop. Refer to the following steps to learn how to do so. Step 1: Right-click the empty area of the desktop, place the pointer at the New option and then select Shortcut. Step 2: In the window, type in one of the following commands after the path:C:\Windows\System32\, based on which shortcut you want to create. For shutdown: Shutdown.exe For restart: shutdown -r -t 0 For log off: Logoff: shutdown -l -t 0 For hibernate: rundll32.exe powrprof.dll, SetSuspendState 0,1,0 Note: Replace the C with the drive letter of the drive where Windows 10 is placed. Step 3: Give the shortcut a name.

How To Enable Desktop Background Slideshow In Windows 10

Image
The feature of slideshow users see on the desktop, the effect of which is to change the desktop background at a certain interval, made its debut in Windows 7. Windows 10 has inherited the feature and move the settings relevant to this feature to Settings. Refer to the following steps to learn how to change its settings. Step 1: Right-click on the Start Menu and then select Settings. Step 2: Navigate to Personalization > Background. Step 3: On the right page, click on the down-triangle arrow under the Background section to expand the drop-down menu. Step 4: Select Slideshow.

How to Disable App Suggestions in Start Menu in Windows 10

Image
Although apps under the suggested section on the start menu are often considered high-quality, not all users like the above-board advertisement. The good thing is that Windows 10 allows users t disable the suggestion. Refer to the following steps to see how we can remove it from the Start Menu. Step 1: Press Win + Q and enter Settings to open it. Step 2: Navigate to Personalization  >  Start. Step 3: On the right page, look for Show suggestions occasionally in Start and then turn off the toggle under it.

[Fixed]Settings Missing From Start Menu in Windows 10

Image
The application of Settings in Windows 10 is considered to be a new version of Control Panel, inheriting most of the settings and options from the old Control Panel. Perhaps partly because of its importance, Windows 10 offers several quick ways to open the application. It is on the start menu and in the action centre. Besides, you can open it by pressing Win + I. For users who are used to opening it via the Start menu, the absence of the settings icon on the menu could be frustrating. If you are concerned about the problem, use the steps to make it appear on the start menu. Step 1: Press Win + I to open Settings . Step 2: Navigate to Personalization > Start . Step 3: Click on the button labelled  Choose which folders appear on Start. Step 4: Turn on the toggle under Settings to make it appear on Start.

How to Clear File Explorer History in Windows 10

Image
In Windows 10, File Explorer keeps track of all the files/folders recently opened. Quick Access, which is one of the features of File Explorer, shows files and folders you recently have opened. If privacy is one of your concerns and it happens that you share the computer with other users, To keep clearing File Explorer will be a good habit to develop. Refer to the following steps to learn how to clear File Explorer history. Step 1: Press Win + E to launch File Explorer. Step 2: Click on the File tab and select  Change folder and search options. Step 3: Under the General tab, look for a section called Privacy. Step 4: Click on the Clear option within the section to clear File Explorer history.

How to View Saved WI-FI Password in Windows 10

Image
This article tells users how to find the saved Wi-Fi password in Windows 10, if you want to connect any device to your Wi-FI network but forgot your Wi-Fi network password, use the following steps to view the Wi-Fi password on your computer. Step 1: Right-click on the Start menu, and then select settings. Step 2: Click on Network & Internet. Step 3: On the right page, scroll down to the Change your network settings section, and then click on change adapter options. Step 4: Double-click on the Wi-Fi icon to open its status dialogue. Step 5: Click on Wireless Properties, and then click on the Secuirty tap in the window that has come up. Step 6: Check off the box next to Show Characters to view the Wi-Fi passowrd.