Posts

Showing posts from December, 2020

How to Disable Automatic Updates in Microsoft Store in Windows 10

Image
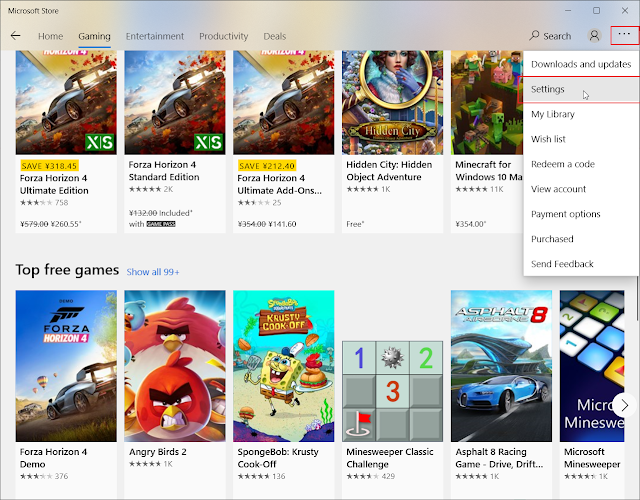
Microsoft Store is a trusted place for Windows 10 users who want to safely download and install applications and games. Not only does Microsoft Store boasts hundreds of applications, but it also has a sweeping array of features, strikingly improving user experience. You can configure Microsoft Store to make it automatically download new versions of your applications. This is a relieving feature for users who don't want to download every new version of the applications on the computer. But If you prefer to update applications by yourself, you have to turn off the automatic update feature. Refer to the following instructions to learn how to disable or enable automatic updates in the Microsoft Store. Step 1 : Type in Microsoft Store in the search bar and then press Enter to open it. Step 2 : Click on the three horizontal dots in the upper-right corner. Step 3 : Click on Settings on the drop-down menu. Step 4 : Within the App updates section, turn off the toggle to disable it.

How to Disable or Enable Delete Confirmation Dialog in Photos App in Windows 10

Image
If you intend to enable the Delete confirmation dialog prompted by the Photos app in Windows 10, this article perhaps can help you. By default, the Photos app doesn't bring about the confirmation box when users are deleting an item. However, users can enable it by using the steps delineated in this article. The Photos app is one of the best image viewers available on Windows 10. Whether you have a JPG or PNG image or a video file, this app can serve you well. However, If you inadvertently click on the delete button on the keyboard. the item located will be deleted instantly, which is a whopping testimony to the importance of confirmation dialog. You could use the following steps to enable the delete confirmation: Step 1 : Launch the Photos application. Step 2 : Click on the three horizontal dots in the upper-right corner. Step 3 : Click on Settings . Step 4 : Scroll down to find the Display delete confirmation dialog option. Step 5 : Toggle the button on/off to enable/disable it.

How to Enable or Disable Tablet Mode in Windows 10

Image
It's common knowledge that Windows 10 works well on desktops and laptops. But not everyone knows that a feature has been provided to make sure that users can transform the OS into something that can work excellently on a tablet computer system. This feature is called Tablet Mode, and users are allowed to enable and disable it at any time, even if they are not currently using a tablet. It is a fascinating feature, no doubt, but not all Windows 10 users know how to turn it on and off at will. You could refer to the following steps to learn how to enable/disable it. Step 1 : Press Win + I to open Settings . Step 2 : Navigate to System > Tablet . Step 3 : Click on the blue link, Change additional tablet mode . Step 4 : Turn on/off the Tablet mode toggle to enable/disable this feature.

How to Enable Windows 10 Full Screen Start Menu via Registry Editor

Image
If you intend to enable Windows 10 Full-screen Start Menu, you can do so via Registry Editor. You probably know how to enable the feature of full-screen Start Menu in Windows 10 by making the changes from Windows Settings, now let us see how to enable it via Registry Editor. Before you begin, it is recommended to backup all your Registry files and create a System Restore point lest some irreversible misstep happens.  Step 1 : Press win + R to open the Run box. Step 2 : Type in Regedit and then press Enter . Step 3 : Navigate to HKEY_LOCAL_MACHINE\SOFTWARE\Policies\Microsoft\Windows\Explorer Step 4 : R ight-click Explorer > New > DWORD (32-bit) Value . Step 5 : Name the new value as  ForceStartSize . Step 6 : D ouble-click it to change the Value data to  2 . Step 7 : Click on OK to save the change.

How to Turn off Notification Mirroring in Windows 10

Image
If you do not want to receive a phone notification on your PC, you can turn off Notification Mirroring in Windows 10 via Registry Editor. Windows 10 permits users to connect their phone and receive notifications on the PC. It comes via the Action Center. However, if you intend to keep the link between your phone and the PC but do not want to get the notification, you can disable the feature using the following steps: Step 1 : Press Win+R to open the Run box. Step 2 : Type in Regedit and press the Enter button. Step 3 : Navigate to HKEY_CURRENT_USER\SOFTWARE\Policies\Microsoft\Windows\CurrentVersion\PushNotifications Step 4 : Right-click on the key >  New > DWORD (32-bit) Value. Step 5 : Name the value as DisallowNotificationMirroring . Step 6 : Double click on it and set the value data as 1. Step 7 : Click on OK to confirm your change.

How to Clear Windows 10 Search History

Image
If you intend to  clear Windows 10 search history , then this article will walk you through the steps. You can delete the Taskbar search history from Settings. It is also feasible to disable the search history collection via Registry Editor too. Whenever you search for an application or anything else using the Taskbar search box, The computer stores the information. The reason for that is to provide a better user experience by adopting your search behavior. Also, it presents the recent search items when you click on the Taskbar search box. For example, if you have searched for Chrome recently, you can find it when you click on the search box. If you do not want to make this kind of information visible, here is what you can do to disable this feature: Step 1 : Press Win+I to open Settings . Step 2 : Click on Search . Step 3 : Make sure that you are in the Permissions & History tab. Step 4 : Scroll down the right page to find out the History section. Step 5 : Click the Clear devic

How to Make Chrome Always Show Full URLs in the Address Bar

Image
Given that users may benefit from a cleaned-up version of the address bar, Google has hidden the https:// and www part of the URL that usually shows in full length in the address bar. Users favoring seeing the whole address need to only double-click in the address bar to prompt it. But what if you want the Chrome browse to always present the full URL? To make the Chrome browser always show the full URL, including HTTPS and WWW in the Address Bar, use these steps: Step 1 : Open the Chrome browser. Step 2 : Right-click on the address bar. Step 3 : Select the Always show full URLs option on the drop-down menu.

How to Enable Lock Screen Instead of Sleep Mode in Windows 10

Image
As many users have learned,  Windows 10 locks the user account automatically when the computer is inactive for a few minutes. However, in some scenarios, it triggers Sleep mode instead of locking the screen. This is particularly inconvenient when you are working in public and need to leave your computer alone for a while. Hence, if you want to enable your computer to lock the screen automatically, use these steps: Step 1: Press Win+I to open Windows Settings . Step 2: Navigate to Accounts > Sign-in options . Step 3: Scroll down the right page to look for the Require sign-in section. Step 4: Make sure that the When PC wakes up from sleep option is selected

[Fixed]Google Chrome Not Showing Most Visited Sites Shortcuts in Windows 10

Image
Many web browsers offer nice features to give users easier access to browse their favorite websites quickly as soon as they are launched. That's why many users consider the ‘Most visited sites‘ area on Chrome’s starting page very helpful. The feature serves every user well because it works with individual Cookie data. However, in some scenarios, the ‘most visited websites’ area won't show up in Google Chrome. If you are running into this issue, don't worry, use the following steps to fix it: Step 1 : Launch Chrome and then create a new tab. Step 2 : Click on the Customize option in the lower-right corner. Step 3 : Click on the Shortcuts option. Step 4 : Make sure that the Hide shortcuts toggle is Off.

Enable High Contrast Warning Message and Sound in Windows 10

Image
In this article, you will learn how to enable High Contrast Theme Warning Message and Sound in Windows 10. This feature is designed to enhance the usability criteria of the operating system and for the users who have various health issues. High Contrast Themes in Windows 10 comes in handy for computer users who have an eye-sight disability, because they heighten the color contrast of items such as text, windows borders, and images on the screen, to render them more visible and easier for users to read and identify. When they are enabled or disabled, a warning message and sound is heard. You can use these steps to enable High Contrast Warning Message and Sound: Step 1 : Type in Control Panel in the search bar and then open it. Step 2 : Click on  Ease of Access center . Step 3 : Click on the Make the computer easier to see on the right pane. Step 4 : Tick the three boxes next to the following three options respectively within the High Contrast section. Display a warning message when tu

How to Export Logins and Passwords From Firefox Browser

Image
In this article, you will learn how to export passwords from Firefox. Like any other popular browsers, Firefox also offers a password manager to help users store and manage saved logins and passwords and to ease the use of them whenever needed. It also provides the feature to export logins. This can come in handy when you want to move saved passwords from Firefox to another browser. Refer to the following steps to learn how to do so: Step 1 : Open the Firefox browser. Step 2 : Click on the menu button. Step 3 : Click on the Logins & Passwords button. Step 4 : Click the 3 horizontal dots in the upper-right corner. Step 5 : Choose Export Logins . Step 6 : Click on Export to confirm your choice and Save the export.

How to Disable Right-Click Context Menu in Start Menu of Windows 10

Image
In this article, we will explain to you how to enable the right-click context menu on the Start menu in Windows 10. When users right-click a pinned application on the Start menu, we are able to perform several operations such as resizing the tile, pinning an application as tile, uninstalling an application, unpinning a tile or a group of tiles, and opening the file location of a program. If you don’t want to disable this feature, then you can use these steps to do so: Step 1 : Press Win + R , type in Registry Editor and then open it. Step 2 : Navigate to: HKEY_LOCAL_MACHINE\SOFTWARE\Policies\Microsoft\Windows\Explorer Step 3 : Right-click on the empty area on the right pane and then select New >  DWORD (32-Bit) Value . Step 4 : Name the value  DisableContextMenusInStart. Step 5 : Double-click on the value and then change the value of it to 1 and then press OK.

[Fixed] Single-Click to Open an Item Is Greyed Out in File Explorer Options

Image
It’s not difficult to configure options relating to the opening of folders/files in Windows with a single-click or double-click. Users can simply change it by accessing the File Explorer Options and then choosing between double click or single click. However, users who open File Explore Options may find that the Single-click option is grayed out. If you are confronted by this issue, refer to the following steps to learn how to fix it. Step 1 : Type in Registry Editor in the search bar and then open it. Step 2 : Navigate to  HKEY_CURRENT_USER\SOFTWARE\Microsoft\Windows\CurrentVersion\Policies\Explorer Step 3 : Select the ClassicShell entry on the right pane. Step 4 : Right-click on the entry and select Delete . Step 5 : Navigate to the following address and then delete the HKML key. HKEY_LOCAL_MACHINE\SOFTWARE\Microsoft\Windows\CurrentVersion\Policies\Explorer Step 6 : Exit the Registry Editor and reboot your PC.

How to Repair a Corrupted Word File

Image
Users may fail to open a Microsoft Word document for multiple reasons. You may see a piece of the original data or nothing at all. If you encounter a similar problem, this article will walk you through how to either open or partially recover data from a damaged document in Word. When it comes to a damaged document, it might be a file that refuses to open at all or that opens with issues within the document. At times you may see the content littered with garbage, while at other times, the content may be crammed with binary digits. A working solution is to use the Recover Text from Any file. Refer to the following steps to learn how to do it. Step 1 : Launch Word and navigate to File > Open , and then click on the Browse on the right pane. Step 2 : In the file dialogue box, click the drop-down menu next to the file name box. Step 3 : Select R ecover Text from Any File . Step 4 : Browse the computer to select the corrupted document. Step 5 : Click on Open to start recovering it.

How to Get Back Power Management Tab in Device Manager in Windows 10

Image
If you intend to change something with respect to the PC's power management, but find that the Power Management tab in Device Manager is missing, here is what you could do to restore it. Only a tiny change to the Registry Editor is needed to get back the Power management tab. Refer to the following steps to learn how to do that: Step 1 : Type in Registry Editor in the Taskbar search box. Step 2 : Click Registry Editor in the search result to open it. Step 3 : Click on the Yes button. Step 4 : Navigate to: HKEY_LOCAL_MACHINE\SYSTEM\CurrentControlSet\Control\Power Step 5 : Right-click on Power , select New and then DWORD (32-bit) Value . Step 6 : Name the new value as CsEnabled  and then set the Value data as 1. Step 7 : Reboot your computer.

How to Enable Accent Color in Microsoft Edge

Image
This article will explain to you how to enable Accent Color in Microsoft Edge. in earlier versions of Edge, it only supports light, default, and dark mode themes. Now, Microsoft Edge has offered a new accent color feature. users can apply color on places such as tabs, new tab background, and toolbars. Although by default This feature remains hidden, you can use the following steps to enable accent color feature. Step 1 : Launch Microsoft Edge . Step 2 : Type in the following address in the address bar to access the Flags page. edge://flags Step 3 : Type in enable picker in the search bar and locate it. Step 4 : Expand the drop menu of this located experiment and select Enabled . Step 5 : Restart Microsoft Edge.

How to Manually Allow a Blocked App or File in Windows Security

Image
If a file or app has been blocked by the in-built antivirus provided by Windows 10 and you want to unshackle the app via  Windows Security , this article will tell you what you will have to do. Windows security is one of the most popular security software for Windows 10. Besides giving protection against malware, it can check the device’s performance with ease. Users often use this tool to scans for malicious files and applications, which can be blocked automatically. We don't recommend users to allow a blocked app without due consideration. Since the security shield has blocked the app or file because it detected some dubious activity. Unless you are sure that the app or process is innocuous, we recommend you to keep the settings as it is. To unblock an app or file, use these steps: Step 1 : Type in Windows Security in the search bar and then open it. Step 2 : Click on the Virus & threat protection button. Step 3 : Click on the Protection history link. Step 4 : Choose an ap

How to Backup Bookmarks From Firefox Browser

Image
This article will show how to   export or backup bookmarks from the Firefox   browser. All the bookmarks available in the   Bookmarks menu ,  sub-folders,  Bookmarks toolbar ,   and   Other Bookmarks   can be backup up and exported. Thus, if you accidentally delete some bookmarks, you can easily  restore them. You can use these steps to backup bookmarks from Firefox as a JSON file or export them as an HTML file. Step 1 : Launch the Firefox browser. Step 2 : Click on the setting icon in the upper-right corner. Step 3 : Navigate to Library > Bookmarks > Show all bookmarks Step 4 : Click on the Import and Backup option. Step 5 : Select Backup .

Two Ways to Open Sound Settings in Windows 10

Image
To customize,  configure , or adjust the sound scheme for your device, you should access the sound settings in Windows 10. You might need to tweak those settings because you might have issues with the audio playback of your PC,  or be confused by why the sound is recording at low volume.  In this article, we will show you 2 ways of opening  Sound Settings  in Windows 10. Open Sound Settings via the Settings app Step 1: Press Win + I to open Settings . Step 2: Navigate to Personalization > Themes . Step 3: Scroll down the right page and then click on Advanced sound settings . Open Sound Settings via Control Panel Step 1: Press Win + R to open the Run box. Step 2: Type in Control panel and then hit Enter to open it. Step 3: Change the View by option in the upper-right corner to Large icon s. Step 4: Click on Sound .

How to Create a Video From Images by Using Photos App in Windows 10

Image
If you intend to create a video from some still images by using the  Photos application  in Windows 10, then this article will lend you a helping hand. Rather than using some video editing software downloaded from the Internet  to create a video out of your pictures, users can use the in-built Photos app. Refer to the following content, which is everything you need to know to make a movie out of your photos in the Windows 10 Photos app. Step 1 : Put all images you need in a folder. Step 2 : Press Alt + A to select them all and right-click on a random image. Step 3 : Choose the Create a new video option from the drop-down menu. Step 4 : Type in a name for your video project. Step 5 : Choose images from the library and drag them into the Storyboard . Step 6 : You can click on the Text option to write some text on an image. The Motion option is used to apply various motion effects. Step 7 : Click on the Finish video option. Step 8 : Select Video quality and click the Export button. S

How to Change Yor Email Name in Gmail

Image
I f you intend to  change your email name in Gmail,   this article will help you. It can also help you  rectify the spelling mistake in the email display name step by step. Gmail is one of the most popular email service providers.It allows users to enter a name for the user account. If you made a spelling mistake in your name during the creation of the email address, it would be better to use the following steps to change your name rather than creating a new email account. Use these steps to change your email name in Gmail. Step 1 : log in to your Gmail account. Step 2 : Click on the setting gear button in the upper-right corner. Step 3 : Click on the See all settings button. Step 4 : Switch to the Accounts and import tab. Step 5 : Click on the edit info button within the Send mail as section. Step 6 : Enter a new name. Step 7 : Click on the Save changes button.

How to Set up a Bluetooth Adapter Replacement in Windows 10

Image
Drivers in Windows 10 play an important role in making their corresponding devices function. This logic applies the Bluetooth feature too. If the Bluetooth driver of your computer fails to work, but you want to replace it with another Bluetooth adapter, you have to install the new replacement driver. However, you can’t just simply download and install the adapter if the Bluetooth adapter is deeply integrated into your motherboard card. That method doesn't work because Windows will keep detecting the driver. On top of that, it allows one device to have only one driver. Hence, to  install a Bluetooth adapter you need to manually uninstall the previous driver, as the following steps show: Step 1: Disable the old Bluetooth adapter via Device Manager . Step 2: Install a new Bluetooth adapter by connecting it to the computer. Step 3: Check the new Bluetooth adapter via Settings .

How to Install the Bluetooth Driver Manually

Image
As computer users know, the Bluetooth driver software should install automatically. But if Windows fails to install a certain driver, you should use the manual installation option. Usually, the latest driver of a certain device is available on the driver manufacturer's official website. Along with the driver, the driver manufacturer’s website also provides installation instructions. But you can also install it manually via Settings, as the following steps show: Step 1: Press Win + I to open Settings. Step 2: Navigate to  Updates & Security >  Windows Update. Step 3: Click on the  Select View optional updates link under the Check for updates button  on the right pane. Step 4: Expand the driver updates menu and choose your Bluetooth driver. Step 5: Click on the Download and install button.

How to Find Out the Version of Firefox You Have in Windows 10

Image
In this article, we will show how to find out the version of the  Mozilla Firefox  browser that you are using on your Windows 10 computer. You may want to do so to confirm your current version and make sure that the computer is running the latest version. Use these steps to find out your version of Firefox browser: Step 1: Launch  Mozilla Firefox browser. Step 2: Click on  the More button in the upper-right button to bring up the drop-down menu. Step 3: Navigate to Help > About Firefox . Step 4: You can see the Firefox version displayed in the box that has popped up.

How to Find Out the Version of Edge Browser You Are Using on Your PC

Image
In this article, we will show how to find out the version of the Edge  browser that you are using on your Windows 10 computer. You may want to do so to confirm your current version and make sure that the computer is running the latest version. Use these steps to find out your version of Edge browser: Step 1: Launch Microsoft Edge browser. Step 2: Click on the horizontal ellipsis button in the upper-right corner to expand the drop-down menu. Step 3: Navigate to Help and feedback >  About Microsoft Edge . Step 5: You will see the Edge version there.

How to Check Your Chrome Browser Version in Windows 10

Image
In this article, we will show how to find out the version of the  Chrome  browser that you are using on your Windows 10 computer. You may want to do so to confirm your current version and make sure that the computer is running the latest version. Use these steps to find out your version of Chrome browser: Step 1: Open Google Chrome browser Step 2: Click on the vertical ellipsis button in the upper-right corner to bring up the drop-down menu. Step 3: Navigate to Help >  About Google Chrome. Step 4: You will see the Chrome version there.

How to Disable Access to Folder Options in Windows 10

Image
Many useful features are included in the Folder Options in Windows 10, such as show all drivers, reset folder view, show/hide drive letters, show or hide menus, show hidden folders and files, and many more. There are many ways users can access Folder Options, such as the Search bar and File Explorer. If you don't want someone to change the settings tweaked by you, you can disable Folder Options, as the following instructions show: Step 1 : Press Win + R , type in Regedit and then open it. Step 2 : Navigate to HKEY_CURRENT_USER\SOFTWARE\Microsoft\Windows\CurrentVersion\Policies\Explorer Step 3 : Right-click on the right pane, click on New and then DWORD (32-bit) Value . Step 4 : Rename the value NoFolderOptions . Step 5 : Double-click on NoFolderOptions , add 1 in the Value data box and then press OK. Step 6 : Re-launch File Explorer to confirm the change.