Posts

Showing posts from January, 2021

How to Clear Windows Update History in Windows 10

Image
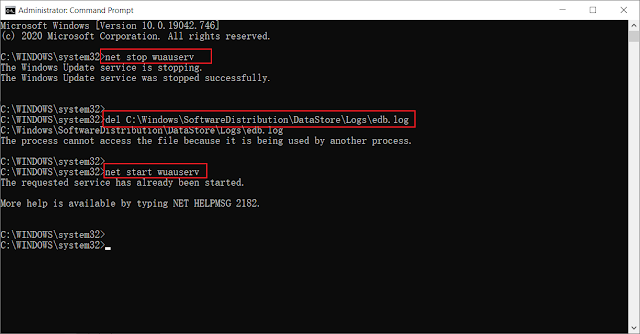
This article will explain to you how to clear Update History in Windows 10. Occasionally, Windows 10 brings driver updates, quality updates, and other updates, and the list of all the installed updates is visible on the update history page. Users can easily look for their windows 10 Update History to get information about all updates present on the list. If you want to remove the update history in Windows 10, then you can the following steps: Step 1 : Right-click on the start menu and then select Command Prompt (Admin) . Step 2 : Type in the following commands and then press enter at the end of each line. net stop wuauserv del C:\Windows\SoftwareDistribution\DataStore\Logs\edb.log net start wuauserv

How to Share Files and Folders in Microsoft One Drive

Image
OneDrive is an effective tool for storing your files in the cloud. But do you know it is possible to share your files and folders easily? From our experience with OneDrive, we can state for certain that it is easy to share files and folders. In this article, we will explain to you the best way to share folders in OneDrive. We will do the trick via the website rather than the app since it is easier and convenient to use. Refer to following instructions to learn how to do so: Step 1 : Open the OneDrive website. Step 2 : Right-click the folder you want to share from the website.  Step 3 : Click on the Share button. Step 4 : Type in the necessary information to customize the link.

How to Solve the Power Plan Keeps Changing Issue in Windows 10

Image
One of the issues that many Windows 10 users are complaining is that their PCs’ power plan keeps changing without their knowledge, not least after a reboot. This is a common issue encountered by many users and especially reported by those who recently upgraded motherboard or updated their Windows 10 Operating System. To fix the problem, you could reset the power plan. Refer to the following steps: Step 1 : Type in Control Panel in the search bar and then  open it. Step 2 : Navigate to Power Options > Change Plan settings > Changed advaced power settings Step 3 : Click on Restore plan defaults . Step 4 : You can also create a new power plan by clicking the Create a power plan button on the left pane of the Power Option window.

How to Insert a Word Document Into Another Word Document

Image
Did you know how to insert a Word document into another Word document? Yes, it is very much possible to do so, and it’s not hard to get done either. Most people are more likely to open a document, copy the content from it and then paste it into another Word document. That’s not a wrong way to do it, but it is more time-consuming than the following instructions: Step 1 : Open a Word document. Step 2 : Select the Insert tab in the upper-left corner. Step 3 : Locate the Text section, click on Object and then choose  Choose Text from File . Step 4 : select a Word file and add it to your document.

How to Cut Videos in Vlc Media Player

Image
VLC Media Player is not just a tool created for playing music and videos. If you intend to play content in the least popular formats, then VLC will do the trick. But what if you want to edit or cut a video? For most of us, the most straightforward option is to use a third-party video editor, or even the built-in Video Editor app offered Windows 10. Instead of loading up another application to perform such a simple action, one can continue using VLC because it is equipped with this capability. It’s not as easy compared to standard video editors, but it works quite well. Refer to the following steps to learn how to use it: Step 1: Download and install the latest version of VLC Media Player on your computer. Step 2: Select the file you want to cut. Step 3: Click on the Advanced Controls button. Step 4: Scour for the record button. Step 5: Play the file to the section you want to cut.  Step 6: Begin the cutting process.

How to Change the Default Save Location in Microsoft Word

Image
Based on the years-long experience of using Microsoft Office software, we can claim for certain that it is a pretty easy task to save a document to your hard drive. What's more, Microsoft has made this much easier even introduced new features. In most cases, if Microsoft Office asks where to save a file, it recommends users to save it to OneDrive. And it also allows you to change the location. Besides, this requires you to perform the same action every time when you want to save a new document. To change the default save location, use the following instructions: Step 1 : Click on the File tab in the upper-left corner. Step 2 : Select Options . Step 3 : Choose the Save tab via Word Option. Step 4 : Tick off the button next to the  Save to Computer by Default button on the right pane and then enter the default local file location .

How to Connect Bluetooth Headphones to PC in Windows 10

Image
Most users may be quite used to pair Bluetooth headphones with smartphones. But when it comes to how to connect them to your Windows PC, the process is complicated than the former. In this article, we will explain to you how to do so via the Settings application on your computer. Refer to the following instructions: Step 1 : Press Win + Q to open Search . Step 2 : Type in Settings and then open it. Step 3 : Navigate to Devices >  Bluetooth and other devices. Step 4 : Make sure that the Bluetooth option on the right is turned on. Step 5 : Click on  Add Bluetooth or other device and then click on Bluetooth. Step 6 : If the headphones are successfully connected to your computer, it should appear on the list devices. Step 7 : Click on the Bluetooth headphones to start the pairing process.

How to Create a Shortcut to Open Microsoft Edge Browser in Inprivate Mode

Image
This article is intended to help Firefox users create a shortcut to open Edge browser in InPrivate Mode. directly.  InPrivate  Mode helps users create a temporary session which is detached from the browser’s main session and user data. Every browser is designed to store information in the form of browser history, searches, cookies, passwords, etc. It could spare users the trouble of entering the website address manually whenever he/she visits the website. However, this feature may slow down the speed of the browser, affecting the browsing experience. To boost your browsing experience, you can try opening the browser in  InPrivate  Mode. Step 1 : Right-click on the empty space on your Desktop. Step 2 : Select  New > Shortcut  from the drop-down menu.      Step 3 : Type in the following path to the msedge.exe file in the box. "%ProgramFiles%\Microsoft\Edge\Application\msedge.exe" -inprivate If you are using a 64-bit Windows version, you could use the following path: "%P

How to Hide Browser Extension Icons in Firefox

Image
Are you the kind of person who downloads several extensions when using Firefox ? It sure can be tantalizing to do this, given that the add-on store is filled with excellent tools. However, Installing multiple extensions may well make your toolbar a colossal mess. Worry not because we're going to present an easy way of how to tackle this problem. Refer to the following instructions: Step 1 : Launch the  Firefox  browser. Step 2 : Look for the extension you want to hide on the Toolbar in the upper-right corner. Step 3 : Right-click on the add-on and then select  Pin to Overflow menu . Step 4 : With this operation performed, the add-on will be hidden in the Overflow  Menu ,  which you can open by click on the two-arrow icon next to the toolbar.

How to Create a Shortcut to Open Firefox Browser in Private Browsing Mode

Image
This article is intended to help Firefox users create a shortcut to open Google browser in Private Browsing Mode. directly.  Private Browsing Mode helps users create a temporary session which is detached from the browser’s main session and user data. Every browser is designed to store information in the form of browser history, searches, cookies, passwords, etc. It could spare users the trouble of entering the website address manually whenever he/she visits the website. However, this feature may slow down the speed of the browser, affecting the browsing experience. To boost your browsing experience, you can try opening the browser in   Private Browsing Mode . Step 1 : Right-click on the Firefox icon on the desktop. Step 2 : Select Properties . Step 3 : Switch to the Shortcuts tab. Step 4 : Affix ' -private ' to the end of the address in the Target box. Step 5 : Click on OK .

How to Hide Browser Extension Icons in Edge

Image
Are you the kind of person who downloads several extensions when using Edge? It sure can be tantalizing to do this, given that the extension store is filled with excellent tools. However, Installing multiple extensions may well make your toolbar a colossal mess. Worry not because we're going to present an easy way of how to tackle this problem. Refer to the following instructions: Step 1 : Launch the Edge  browser. Step 2 : Look for the extension you want to hide on the toolbar in the upper-right corner. Step 3 : Right-click on the extension and then select  Move to the menu . Step 4 : With this operation performed, the extension will be hidden in the  Menu, which you can open by click on the three horizontal dots next to the toolbar.

How to Create a Shortcut to Open Chrome in Incognito Mode

Image
This article is intended to help Chrome users create a shortcut to open Google browser in Incognito Mode. directly. Incognito Mode helps users create a temporary session which is detached from the browser’s main session and user data. Every browser is designed to store information in the form of browser history, searches, cookies, passwords, etc. It could spare users the trouble of entering the website address manually whenever he/she visits the website. However, this feature may slow down the speed of the browser, affecting the browsing experience. To boost your browsing experience, you can try opening the browser in Incognito Mode. Step 1 : Right-click on the empty space on your Desktop. Step 2 : Select New > Shortcut from the drop-down menu. Step 3 : Type in the following path to the chrome.exe file in the box. C:\Program Files (x86)\Google\Chrome\Application\chrome.exe" --incognito Step 4 : Click on the Next button to continue. Step 5 : Name the shortcut. Step 6 : Choose a

How to Configure System Restore Interval in Windows 10

When the System Restore feature is turned on in Windows 10, the system will automatically create a restore point at critical moments like installing a new program or before a Windows Update. Like other applications, System Restore takes space and should be configured properly, so users do not run out of storage space. In most cases, Windows will create a system restore point automatically and periodically by default. It also creates a system restore point when noticing that a major change is happening to your system. To adjust its interval, use these steps: Step 1 : Press Win + R to open the Run box. Step 2 : Type in Regedit and then open it. Step 3 : Navigate to: HKEY_LOCAL_MACHINE\SOFTWARE\Microsoft\Windows NT\CurrentVersion\SystemRestore Step 4 :  Change the RPGlobalInterval value  from its default setting of 86,400 seconds (that is 24 hours) to the desired value in seconds.

How to Hide Browser Extension Icons in Chrome

Image
Are you the kind of person who downloads several extensions when using Chrome? It sure can be tantalizing to do this, given that the web store is filled with excellent tools. However, Installing multiple extensions may well make your toolbar a colossal mess. Worry not because we're going to present an easy way of how to tackle this problem. Refer to the following instructions: Step 1 : Launch the Chrome browser. Step 2 : Look for the extension you want to hide on the toolbar in the upper-right corner. Step 3 : Right-click on the extension and then select Unpin . Step 4 : With this operation performed, the extension will be hidden in the Extensions folder.

How to Set Quick Actions in Action Center in Windows 10

If a user wants to get quick access to his/her commonly used apps and settings in Windows 10, then Action Center is what lends them the convenience. Here, you can find all your application notifications, as well as some quick actions. Most users relish its default setup, but don't know that it can be customized. To cap the thing off, if uisers find it difficult to manage the changed setup, you are allowed to revert to the original. Refer to the following instructions to learn how to set Quick Actions in the Action Center. Step 1 : Press Win + Q to open Search . Step 2 ; Type in Registry Editor and then open it. Step 3 : Navigate to: HKEY_CURRENT_USER\Control Panel\Quick Actions\Pinned Step 4 : Then scour the right pane of Registry Editor for certain programs the presence of which you want allow or prevent. Step 5 : Depending on what you need, you can change the value of each of the items listed on the right pane.

How to Disable Telemetry & Data Collection in Windows 10

Image
The Telemetry and Data Collection feature in Windows 10 is automatically enabled and collects all sorts of user activity and sends them to Microsoft. Microsoft says that they collect the data only to boost the user experience and Windows functionality better – but the number of data breaches across the globe has alarmed users, making them be extra cautious about data privacy. Hence, in this article, we will explain to you how to disable Telemetry and Data Collection in Windows 10. Step 1 : Press Win + R to open the Run box. Step 2 : Type in taskschd. msc. Step 3 : Press CTRL + SHIFT + ENTER to launch Task Scheduler in admin mode. Step 4 : Right-click on the task called Consolidator and then select Disable from the drop-down menu.

How to Disable Address Bar Dropdown List Suggestions in Microsoft Edge

Image
When you use the Microsoft Edge browser to visit a website, the address bar is usually the starting point. Users can either choose to type in a web address or search an engine like Google. Normally, you have to enter the full address of the website you want to visit, including the last character. However, acknowledging Given the difficulty of memorizing the long strings and web addresses, Edge provides the suggestion dropdown list. Although the suggestion dropdown list eases the way to enter an address, it raises some privacy concerns. If you want to disable the feature, use these steps: Step 1: Open the Edge browser. Step 2: Click on the three horizontal dots in the upper-right corner. Step 3: Click on Settings . Step 4: Select the  Privacy, search and services button on the left pane. Step 5: Scroll down the right pane to click on the  Address bar and search option . Step 6: Toggle off the  Show me search and site suggestions using my typed characters option to disable the feature .

How to Configure System Restore Space in Windows 10

Image
When the System Restore feature is turned on in Windows 10, the system will automatically create a restore point at critical moments like installing a new program or before a Windows Update. Like other applications, System Restore takes space and should be configured properly, so users do not run out of storage space. To configure space for System Restore, you could use these steps: Step 1 : Open Control Panel . Step 2 : Select System and Security . Step 3 : Click on System . Step 4 : Click on the System Protection button in the left pane. Step 5 : Switch to the System Protection tab. Step 6 : Select the system disk and then click on Configure . Step 7 : Move the Max Usage slider Within the Disk Space Usage to  increase the disk space usage.

How to Prevent Making Changes to Favorites in Microsoft Edge in Windows 10

Image
In this article, we are going to explain to you  how to prevent making changes to Favorites in Microsoft Edge . Akin to many other modern browsers, Microsoft Edge offers features that allow users to add bookmarks and favorites to the Favorites bar and other folders,  create a new Favorite folder,  cut/paste a favorite, delete or edit a favorite, etc. If you don’t want someone to make any changes to your Favorites settings in the Edge browser, you can do the trick by tweaking the Registry. Step 1 : Press Win + Q to open Search . Step 2 : Type in Registry Editor and then open it. Step 3 : Navigate to: HKEY_LOCAL_MACHINE\SOFTWARE\Policies\Microsoft Step 4 : Create a new key in this folder and name it Edge . Step 5 : Create a DOWRD (32-bit) value and name it EditFavoritesEnabled . Step 6 : Set its value to 0/1 to disable/enable users to make changes to Favorites .

How to Sign Out Other User Accounts in Windows 10

Image
In this article, we will explain to you how to sign out other users using the same PC in order to preserve resources and enhance performance. There are two ways to change the setting. And keep in mind that that you have to be the Administrator user to be able to do this.  The simplest option here is to sign out with the help of Task Manager. Not to mention, many users are used to this tool. If not, you could use the following steps to learn how to sign out other users: Step 1 : Right-click on the taskbar and then select Task Manager . Step 2 : Select the Users tab. Step 3 : Locate another user account. Step 4 : Right-click and select Sign off .

How to Change Default Webcam in Windows 10

Image
To add and use a second webcam to your laptop is quite simple, but to use a secondary camera for chatting and video recording and for the webcam to co-operate with other software applications installed on your computer, you’ll need to disable the computer's built-in webcam and set the secondary webcam as the primary device. Refer to the following steps to learn how to do so: Step 1 : Connect the secondary webcam to your computer. Step 2 : Press Win + R and then type in Control Panel . Step 3 : change View by option to Small icons . Step 4 : Select Devices and Printers . Step 5 : Right-click on secondary webcam and then click on Set this device as default . Step 6 : Type in Device Manager in the search bar and then open it. Step 7 : Expand the Camera tree and then right-click on Webcam driver. Step 8 : Click on disable device .

How to Find How Many Times You’ve Visited a Website on Firefox

Image
By default, all browsers allow users to check their list of previously visited websites but only a clutch of them let users count the numbers of those websites. Browsers such as Firefox grant this availability while other ones like Chrome allow you to find it through an extension. So, if you want to learn how many times you’ve visited a website on Firefox, use the following steps: Step 1 : Launch Firefox. Step 2 : Navigte to Menu > Library > History > Show all History . Step 3 : Switch to the View tab. Step 4 : Click on Show columns and then select Visit count .

How to Solve the Microsoft Edge Won’t Open on Windows 10 Issue

Image
This article will help you fo fix several issues related to Microsoft Edge such as your Microsoft Edge browser won’t open on Windows 10. This may have happened after you have upgraded Windows 10 to a new version or for other reasons. The following solutions are common ones that you could try when you encounter some Microsoft Edge issues. Solution 1:  Clear browsing data If you can't open webpages using Edge, you could use these steps: Step 1 : Launch Microsoft Edge . Step 2 : Click on the three horizontal dots in the upper-right corner. Step 3 : Navigate to   History > Clear browsing data Step 4 : Select the data type you want to clear and click on Clear now. Solution 2: Update Microsoft Edge Sometimes, an older version of Edge may cause problems like the program won’t work properly or keep on crashing. Hence, you could use these steps to see whether you can update Edge and to learn how to update it. Step 1 : Launch Microsoft Edge . Step 2 : Click on the three horizontal dots in

How to Enable Hardware Acceleration in Microsoft Edge

Image
By default, Hardware Acceleration is enabled in Microsoft Edge, which means that the web browser moves all graphics and text rendering from the CPU to the GPU. If you run into issues when using Edge , you may want to disable Hardware Acceleration and see whether it makes a difference. Doing this will also free up important resources on your computer. Hardware Acceleration means that the computer uses its hardware for performing a certain task and function faster than it would otherwise be when using the software. This also allows smooth rendering of graphics. In most processors, the computer execute instructions sequentially. But the computer will perform them faster if users tweak the same process a bit. The idea is to move all graphics and text rendering from the CPU to the GPU, hence boosting better performance. To do so, you could use the following steps: Step 1: Launch the Edge browser. Step 2: Click on the Settings button in the upper-right corner. Step 3: Navigate to Settings &

How to Open Chrome Browser in Full Screen Mode

Image
Most browsers offer a  Full-screen mode  to help users view tabs. The mode is often preferred by users to get rid of the chunk of multiple windows, to view the screen in a more broadened form, or just focus on a specific tab. Besides, each time a person toggles the full-screen mode on, Chrome will hide the taskbar on the bottom and all the tabs will open on the top of the screen. This mode provides a better viewing experience that users can enable when working on writing or simply watching a video. To learn how to do so, you could use the following steps: Step 1 : Launch the Chrome browser. Step 2 : Click on the three vertical button in the upper-right corner. Step 3 : Click on the full screen button next to Zoom to enter the full screen mode. Step 4 : If you want to exit the full screen mode, you could press F11 .

How to Hide Extension Icons in Chrome

Image
Are you the type of person who likes to keep several extensions at hand when using Chrome, ? It sure can be tantalizing to do this, with the extension store filled with excellent tools. However, installing multiple extensions may make your toolbar become a colossal mess. Worry not because there is an easy way to tackle this problem. It would hide an extension as if it weren’t there in the first place. Step 1 : Launch the Chrome browser. Step 2 : Right-click on one of the extensions you have pinned on the toolbar. Step 3 : Click on Unpin to hide it. Step 4 : If you want to pin a certain extension on the toolbar, Click on the extension icon on the tool bar and then click on the pin button next to the extension.

How to Bookmark Pages From Firefox Browsing History

Image
If you intend to bookmark pages from browsing history in Firefox, here is what you need to do. You do not need to install a browser add-on to do the trick, since the Firefox browser allow users to bookmark any page directly from the browsing history. Let’s assume that your browser has run into some issues, and you need to clear the browsing history. You are going to lose the entire list of pages that have been opened before from the browsing history panel. If you have some precious pages in your browsing history and you want to store them, you could use the following steps to keep them. Step 1 : Launch the Firefox browser. Step 2 : Click on the hamburg button in the upper-right corner. Step 3 : Navigate to Library > History > Show All History . Step 4 : Right-click on the website you want to save and then select Bookmark Page . Step 5 : Give the website a name, choose a folder and then enter a tag. Step 6 : Click on the Save button.

How to Enable Window Naming in Google Chrome

Image
Google Chrome is the most popular web browser because the search giant is always keen on bring features and innovation to the forefront. One of its newest feature is the ability to add unique names to each Chrome tab. To enable this feature, which is part of Flags, is not as easy as opening the Settings menu and tick off one of those features in it. Hence, in this article, we will explain to you how to enable the naming feature via Flags in Chrome.  Step 1: Launch the Chrome browser. Step 2: Create a new tab. Step 3: Type in the following code  in the address bar. chrome://flags/#window-naming Step 4: Expand the dropdown menu of the Window Naming section. Step 5: Select Enabled from the menu.

How to Enable the Bookmarks Toolbar Only on New Tab Feature in Firefox

Image
If you intend to enable or show the Bookmarks toolbar only on the New tab page, you could use the instructions explained in this article.  Firefox is one of the most popular browsers for Windows 10. From managing bookmarks to making change to multiple accounts – everything is possible in the Mozilla Firefox browser. Like the Chrome browser and most of the other browsers, Firefox also allows users to bookmark pages to open them later. However, there may be a problem. Although you can access the bookmark toolbar, it shows on all pages. Not everyone like this feature. If you want to disable it, use the following steps: Step 1: Launch the Firefox browser. Step 2: Type in  about:config in the address bar. Step 3: Click on the Accept the Risk and Continue button. Step 4: Type in  browser.toolbars.bookmarks.2h2020 in the search bar. Step 5: Double-click on the search result and change the status to true. Step 6: Right-click on the title bar, select Bookmarks Toolbar and then Only on New T