Posts

Showing posts from November, 2020

How to Disable Show Lock Screen Background Picture on the Sign-in Screen in Windows 10

Image
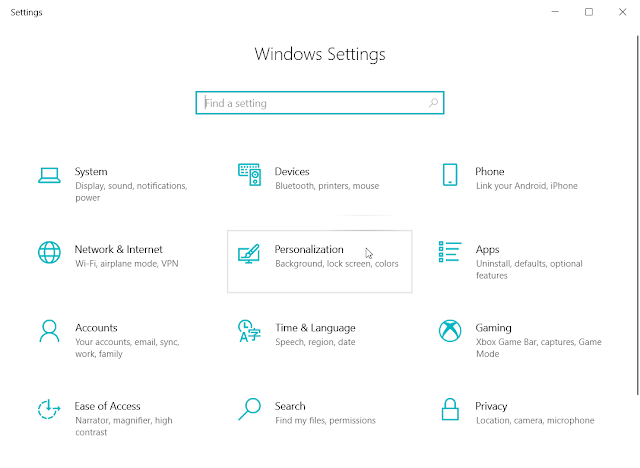
The lock screen displays a picture with time, data, and the applications that you often use on it. Windows allows users all control over settings related to the Lock Screen, which means that you can decide to use which images serve as the lock screen background and how long it will take to replace the current image with the next one. In this article, we are going to expound on how to stop Windows 10 from displaying lock screen pictures.  Step 1 : Press Win + I to open Settings . Step 2 : Navigate to Personalization > Lock Screen . Step 3 : Scroll down the right page to find  the  Show Lock screen background picture  option. Step 4 : Switch off the toggle under it. Step 5 : Reboot your PC to confirm the efficacy.

How to Fix the the System Cannot Find the File Specified Error

Image
"Today I attempted adding some things in Windows Features (Control Panel -> Programs and Features -> Turn Windows features on or off and when applying I received the error message as follows: Windows couldn't complete the requested changes. The system cannot find the file specified. Error code: 0x80070002" This is a question posted by a Windows 10 user. Similar problems abound on the internet. If you have run into it, you can refer to the following steps, which show how to use an effective tool, Registry Editor to effectively solve the problem. Note : This solution is effective but also makes some irrevocable changes to the computer. For computer consistency, it's strongly recommended that you should either back up the registry or create a system restore point that could serve as a precautionary measure if missteps occurred. Step 1 : Right-click on the Start Menu button. Step 2 : Select Run , type in Regedit,  and then press Enter . Step 3 : Navigate to  Comput

How to Solve the Windows 10 Taskbar and Start Button Not Working

Image
Many users of Windows 10 have found that the Taskbar icons or buttons on the desktop will sometimes fail to work. Although this is a common problem, most of them just dismiss it since the problem will be fixed later for no reason. But if you were in desperate need of this feature, the problem would be very annoying. Thankfully, you don't need to download a third-party program to fix the problem. Windows offers a built-in tool that can help you tackle it. Refer to the following steps to learn how to do it. Step 1 : Right-click on the blank area of the taskbar and then click on Task Manager . Step 2 : Click on the File option on the upper-left corner of the window and then click on Run new task . Step 3 : Type in Exploer.exe and click on OK . Step 4 : After that, the computer will restart Explorer, and you will find that everything is responsive again.

How to Disable Removable Storage Access in Windows 10

Image
If other people have access to the computer you use and you want to make sure that confidential files on the computer can't be copied and transferred to some storage device, you can do so by disabling access to removable storage devices and ports, which can be set via Local Group Policy or the Registry Editor. In this article, we are going to show you how to do it via Registry Editor, as the following steps show: Step 1 : Press WIn + R to open the Run box. Step 2 : Type in Regedit and press Enter . Step 3 : Navigate to  HKEY_LOCAL_MACHINE\SOFTWARE\Policies\Microsoft\Windows Step 4 : Right-click on Windows, then select New > Key . Step 5 : Name it as  RemovableStorageDevices . Step 6 : Right-click on  RemovableStorageDevices and then select New >  DWORD (32-bit) Value . Step 7 : Name it as Deny_All . Step 8 : Double-click on Deny_All and then set the value as 1. Step 9 : Click on OK to confirm the setting.

How to Reset Windows Media Library WMDB Files

Image
WMDB, shorthand for Windows Media Library Database, keeps the locations of all the video and audio files stored on the computer. If it gets corrupted, it may well fail to keep those locations anymore. To fix the problem, you can reset the database. Many users reported that after the resetting, the problem has been perfectly tackled. Use the following steps to reset the database: Step 1 : Press Win + R to open the Run box. Step 2 : Type in Services.msc and enter it. Step 3 : Scroll down the right page to find  Windows Media Player Network Sharing Service . Step 4 : Double-click on it and then stop it. Step 5 : Press Win + E to open File Explorer and navigate to “%Userprofile%\AppData\Local\Microsoft\Media Player.” Step 6 : Delete all the WMDB types of files in this folder. Step 7 : Open Windows Media Player to see whether the problem is fixed.

The Process Cannot Access the File Because It Is Being Used by Another Process

Image
It's a well-known fact that users can't modify a file that is in use. For example, if you open a video file in a media player, you will not be able to delete or rename it unless you delete the video file from the playlist or close the media player. A more tricky scenario is when you don't know which program is using the file and consequently, it will continue to warn you that  the process cannot access the file because it is being used by another process. In this case, you can use a third-party program called Lockhunter to unlock it. Step 1 : Go to the official website of Lockhunter. Download and install it. Step 2 : Right-click on the problematic USB drive, select the  What’s locking this folder?  option. Step 3 : Within the locking processes section, select files/programs and then click on the  Unlock it!  button. Step 4 : After that, you will be able to modify the file.

Enable or Disable Microsoft Defender Application Guard for Office

Image
Microsoft Defender Application Guard for Office, once known as  Office 365 Advanced Threat Protection, help users protect the pc by blocking untrusted files, keeping them away from system resources. When dealing with dubious documents, it will open them in an isolated environment. If, for some particular reasons you want to enable/disable this feature, you can use these steps: Step 1 : Press Win + Q , type in Control Panel, and open it. Step 2 : Click on Programs and Features . Step 3 : Click on the Turn Windows features on or off link on the left pane. Step 4 : Check or uncheck the  Microsoft Defender Application Guard option to enable/disable the feature.

How to Rename an Audio Device in Windows 10

Image
Windows 10 offers an easy way for users who want to switch between several devices. For some users,  To immediately select the right device on a  list of devices with superfluous names has been proved hard. Hence, to avoid this trouble, you can use the following guide, which explains how to rename the audio output devices. Step 1 : Right-click on the Start Menu button and select Settings . Step 2 : Navigate to System > Sound . Step 3 : On the right page, select the device the name of which you want to change. Step 4 : Click on the Device properties link under it. Step 5 : Type in a name and click on Rename to confirm the change.

How to Change the Default Font in Chrome Browser

Image
Fonts matter a lot when it comes to the reading experience. For every Chrome user, that law stands too. Since every person has his/her favored and loathed fonts, chrome chooses a neutral and common one to avoid the risk of offending some users. On top of that, it allows users to reset the default font. If you are concerned with how to change the default font in Chrome, refer to the following guide: Step 1 : Launch Chrome . Step 2 : Click on the vertical ellipsis (kebab) icon in the upper-right corner. Step 3 : Select Settings . Step 4 : Navigate to Appearance > Customize fonts . Step 5 : Expand the drop-down menu under Standard font . Step 6 : Select a font you want.

How to Make Chrome PWA Run at Startup in Windows 10

Image
PWA's, shorthand for Progressive Web Apps, can boost the speed at which apps are loaded. Since Chrome supports PWA, you can launch apps when you start using it. While you are browsing the Internet using Chrome and reading pieces of information on a website that offers PWA, this feature will prove very useful. But the feature doesn't automatically launch itself. To enable it, use these steps. Step 1 : Launch Chrome . Step 2 : Type in the following code in the address bar. chrome://flags/#enable-desktop-pwas-run-on-os-login Step 3 : Expand the drop-down menu next to the  Desktop PWAs run on OS login option and select Enabled . Step 4 : Go to a website that supports PWA. Step 5 : Click on the install button at the end of the address bar. Step 6 : Click Install to complete the setting.

How to Restore Deleted Fonts in Microsoft Office?

Image
This article will delineate how to restore fonts that have been inadvertently or deliberately deleted by users. Over a period of time, fonts rarely used when you are working with Words, Excel, or other MS office products might have been deleted. If you want to restore those deleted fonts, refer to the following guide to learn how to do so. Step 1 : Press win + Q to open Search , type in Settings,  and then open it. Step 2 : Navigate to Apps > Apps & features. Step 3 : Scroll down the right page to look for the installed version of Microsoft Office. Step 4 : Click on it and select Modify . Step 5 : Select a mode to repair your Office programs.

How to Export or Download Mailbox From outlook.com

Image
Outlook On the Web is putatively the best email provider that users can use for any purpose. To be a standard email provider, it must allow users to download a copy of data stored in their email accounts. Those who are confronted by the problem of how to get a copy of an outlook email can follow this guide to learn to do so. In this article, we are going to expound on how to export or download a mailbox from Outlook.com. It's doesn't matter whether you store only email or contact, you can download them from the website to your pc without the need to get third-party software to help you.  Step 1 : Go to the Outlook.com website. Step 2 : Sign in to your account. Step 3 : Click on the gear icon in the upper-right corner. Step 4 : Click on the View all Outlook settings link . Step 5 : Navigate to General > Privacy and data . Step 6 : Click the Export mailbox on the right pane. Step 7 : Open the email and click on the link to download it.

How to Check Windows 10 OS Architecture Using Command Prompt

Image
Windows users must be familiar with the scenario in which they have to choose between 32-bit or 64-bit when downloading or installing a certain program. Usually, you can download and install both versions in 64-bit CPUs. And they are several ways to check this piece of information on your computer. One way is to use Command Prompt, as the following steps show: Step 1 : Press Win + R to open the Run box. Step 2 : Type in cmd and press Win + Shift + Enter to open it. Step 3 : Type in the following command and then press Enter . wmic os get osarchitecture Step 4 : Then the Window will present the Windows 10 OS architecture.

How to Disable Face Detection and Recognition in Windows 10 Photos App

Image
The Photos App is the built-in and default photo-sharing program offered by Windows 10 that helps users store, organize, edit, and share them. It's a handy and user-friendly viewer application.  Recently a new feature, People, has been added in Photos. This feature syncs image and contact information from the app People and later groups them according to face detection and recognition. It's appealing to some users, but there are other users who dislike the feature and want to disable it. You can use the following steps to do so. Step 1 : Press Win + Q to open Search , type in Photos , and open it. Step 2 : Click on the Hamburger button in the upper-right corner of the window. Step 3 : Select Settings . Step 4 : Under the View and Editing section, turn the People toggle off. Step 5 : Click on Accept to confirm the change.

How to Properly Update Device Drivers in Windows 10

Image
the device driver plays an important role in offering and maintaining the interaction between the PC and devices, including storage drive, graphics card, mice, keyboard, monitor etc. Given the importance of device drivers, it's sensible that Windows has provided a feature called Windows Update Service, one of the purposes of which is to help users automatically necessary drivers. In most cases, the feature does its bit. But sometimes thanks to unknown reasons users need to update a certain driver manually. To properly update device drivers, use these steps: Step 1 : Press Win + I to open Settings . Step 2 : Navigate to Update & Security > Winodws Update . Step 3 : Click on Check for updates button on the right page. Step 4 : Click on the View optional updates link. Step 5 : Expand the Driver updates entry. Step 6 : Select the drive to update and click on the Download and install button.

How to Disable Sponsored Top Sites in Firefox Web Browser

Image
Mozilla Firefox, one of the most popular web browsers around the world,  is open-source and free. It has done a great job of maintaining the privacy of individuals. It seldom gathers users' information about their browsing habits. However, there is one feature it offers that may annoy some users, the sponsored top sites. It's reasonable since it helps the browser to earn the money needed to maintain itself. But if you don't like the feature and want to disable it,  you can use the following steps: Step 1 : Launch the Firefox browser. Step 2 : Click on the hamburger button in the upper-right corner. Step 3 : Select Options . Step 4 : Click on the Home button on the right pane. Step 5 : Scroll down to the Firefox home content section. Step 6 : Uncheck the Sponsored Top Sites option under Top Sites.

How to Fix Audio Crackling Sounds in Windows 10

Image
"Over the past few days my laptop sound has been crackling and popping both through the speakers and headphone jack. I tried all the methods I could find of reinstalling drivers and messing with the sound control panel settings. Does anyone know why this happened? I have a Lenovo IdeaPad L340 Gaming." This is a question posted on Microsoft Community by a Windows 10 user. Indeed the weird, annoying sound from the PC is tricky to solve since the cause of it is elusive. If you are experiencing the same problem, the following guide may help you solve it: Step 1 : Type in Control Panel in the Search bar and open it. Step 2 : Click on Power Options . Step 3 : Click on the Change plan settings link on the right page and then Change advanced power settings . Step 4 : Scroll down to expand the Process power management tree and then the Minimum processor   state entry. Step 5 : Change the Minimum processor state to 100%. Step 6 : Click on OK to confirm the change.

How to Reset Windows Security App in Windows 10

Image
Windows Security Center is where Windows 10 provides its latest antivirus protection. It's usually get activated once the computer is powered on. It continually scans for viruses, security threats, and malware. But one of its drawbacks is that it could crash for non-specific reasons. One feasible way to grapple with a malfunctioning Windows Security Center that is crashing or won't open is to re-register the Windows Security app. Consequently, it may well work properly again. To reset it, you can use these steps: Step 1 : Click on the Start Menu button. Step 2 : Look for the Windows Security application on the menu. Step 3 : Right-click on it and click on More . Step 4 : Select App settings . Step 5 : Scroll down the window to click on Reset . Step 6 : Click on Reset again to confirm your operation.

How to Change Recycle Bin Storage Size in Windows 10

Image
Recycle Bin is an application created by Windows to help users store deleted files. It functions as a safety net that prevents files recently deleted from being wiped out completely. Usually, files in Recycle Bin stay for a preset and specific period before vanishing entirely. In this period, users are allowed to recover deleted files in Recycle Bin. On top of the limit of time set by the user, Recycle Bin also has a limit of storage size. the computer can't store as many unwanted files as you want, but it allows users to decide the limits. If you want to change the size of it, use these steps: Step 1 : Right-click on the Recycle Bin icon on the desktop. Step 2 : Click the Properties option on the drop-down menu. Step 3 : Every disk has its own Recycle Bin storage size. Select a disk in the Properties window. Step 4 : Set the preferred value in the box next to the Maximum size option. Step 5 : Click OK to confirm the change.

How to Remove Fingerprint From Windows Hello in Windows 10

Image
To log into your computer with your fingerprint is quite handy. It's a novel way to save you from revealing the password to unknown people in public. But not every user relishes using this method to log in his/her computer. If you want to replace it with other ways to log in to a computer, such as PIN, password, or Windows Hello Face. You can use these steps: Step 1 : Press Win + I to open Settings . Step 2 : Navigate to Accounts > Sign-in options . Step 3 : Click on  Windows Hello Fingerprint on the right page. Step 4 : Click the Remove button.

How to Change How Long Windows Waits Before Closing Apps at Shutdown

Image
Almost every computer user is familiar with a process at shutdown when the computer will present the user with apps that it's going to shut them down if not prevented. the default duration is 5 seconds, which allows users to rescue their data and properly shutdown their applications. But if you are not satisfied with the duration and want either to increase or decrease it, you can use the following steps to do so: Step 1 : Press Win + R to open the Run box. Step 2 : Type in Regedit and then press Enter . Step 3 : Navigate to  HKEY_CURRENT_USER\Control Panel\Desktop Step 4 : Look for the HungAppTimeout . If you can't find it, you can use the method written below to create one. Right-click on the blank area of the right page, select New >  DWORD (32-bit) Value and name it as  HungAppTimeout. Step 5 : Double-click on HungAppTimeout . Step 6 : Set a value in milliseconds. Step 7 : Click on OK to confirm the setting.

How to Reset GPU Preferences for Apps to Default in Windows 10

Image
Microsoft has recently brought about a new Graphics setting that allows users to set specific graphics performance preference for respective applications. Preferences adapted to boost a specific application can provide better application performance and save battery life. So, if you are interested in how to change the setting, refer to the following guide: Step 1 : Press Win + I to open Settings . Step 2 : Navigate to System > Display .  Step 3 : Scroll down the right page to look for Graphics settings . Step 4 : Expand the drop-down menu to select a application the GPU preference of which you want to reset. Step 5 : Click on Options and select an option. Step 6 : Click on Save to confirm the change.

Fix Error Code 800704B8-0x3001A in Windows 10

Image
Users who try upgrading to Windows 10 or a new update from Microsoft may occasionally encounter the error code, 800704B8-0x3001A, which sends a signal that there is an operating system error. If you are experiencing the same problem, you can perform a clean boot to fix it.  Use these steps to perform a clean boot: Step 1 : Make sure that you have signed in to the computer as an administrator. Step 2 : Press  Win + Q . Type in msconfig in the  Search  bar and open it. Step 3 : Switch to the  Services  tab, uncheck the box next to the  Hide all Microsoft services , and click the  Disable all  option. Step 4 : Switch to the Startup tab and then click on Open  Task Manager . Step 5 : Click on the Startup tab in  Task Manager . Disable all the startup items. Step 6 : Close  Task Manager . Step 7 : Click on  OK  to confirm the setting. Step 8 : Reboot your computer.

Network Discovery Is Turned off and Not Turning on in Windows 10

Image
As many users of Windows 10 know, when a computer is sharing a network with other devices, the user of that computer is allowed to share files and settings in it. On top of that, Windows 10 allows users to share a network. But some of them trying to do so occasionally encounter this problem: Network discovery is turned off . For users who are experiencing the same problem, we would like to present an effective solution to it. which is to start the required dependency services. Refer to the following steps to learn how to use it. Step 1 : Press Win + R to open the Run box. Step 2 : Type in Services.msc in the Run box and then hit Enter. Step 3 : Scroll down the right page to look for the UPnP device Host option. Step 4 : Right-click on it and select Properties . Step 5 : Expand the Startup type dropdown menu and select Automatic . Step 6 : Click on the Start button under Service status and then click on OK . Step 7 : Use the Steps 3 - 6 for the following services also: Function Dis

How to Prevent Windows 10 From Changing Default Browser

Image
One of the remarkable features offered by Windows 10 is the liberty to making choices related to app selection. For every different protocol, action, and file type, you are allowed to handle those tons of applications at will. And when it comes to Web Browser, Windows would like you to set the Edge as the default one.  However, there are other powerful browsers besides Edge that are popular among users, such as Firefox and Chrome. Although Windows 10 would love to see all its users surf the Internet via Edge, it doesn't prevent users from using other browsers and setting a favorite one as the default browser. But it does keep resetting your choice back to Edge. If you are experiencing this problem,  refer to these steps to learn how to fix it. Step 1 : Right-click on the Start Menu button and then select Settings .  Step 2 : Navigate to Apps > Default settings. Step 3 : Scroll down the right page to look for Web browser . Step 4 : Click on the application presented there and th

How to Prevent Apps From Communicating With Unpaired Devices

Image
For those who are troubled with the unexpected communication between a pre-installed application and an unpaired wireless device,  you can refer to this article to learn how to prevent that from happening. In most cases, by blocking the certain app from sharing information with the unpaired wireless device this problem can be solved. To do so users can make a change via Settings, as the following guide shows. Step 1 : Press Win + Q , type in Settings , and open it. Step 2 : Navigate to Privacy > Other devices . Step 3 : Turn on the toggle under the title Communicate with unpaired devices .

Programs Open and Close Immediately in Windows 10

Image
A few users have reported that certain programs closed immediately after it had been launched. The range of these programs or applications is not limited, ranging from classic programs to UWP apps downloaded from Microsoft.  The tricky part about these situations is the elusive cause of them. It may be because of a storage problem or a permission issue. Here we will post a universal solution that is doable in most cases.  Many programs have a repair tool available for users who encounter problems related to the affected program. You can find this kind of tool or feature via settings, as the following steps show. Step 1 : Press Win + I to open Settings. Step 2 : Navigate to Apps > Apps & features. Step 3 : Scroll down the right page to look for the faulty program. Step 4 : Select it and then click on Advanced options . Step 5 : Scroll down to find and click on Repair under the Reset section. Step 6 : Wait for the tool to repair the program.